There is no turning back now. I reached peak SWE-Maxxing (in zoomer terms). Belive me, this is definitivley not just another procrastination-setup-optimization thing for hackers and alike! This is a short guide showcasing a DIY built split keyboard (Keebio Iris Split v2).
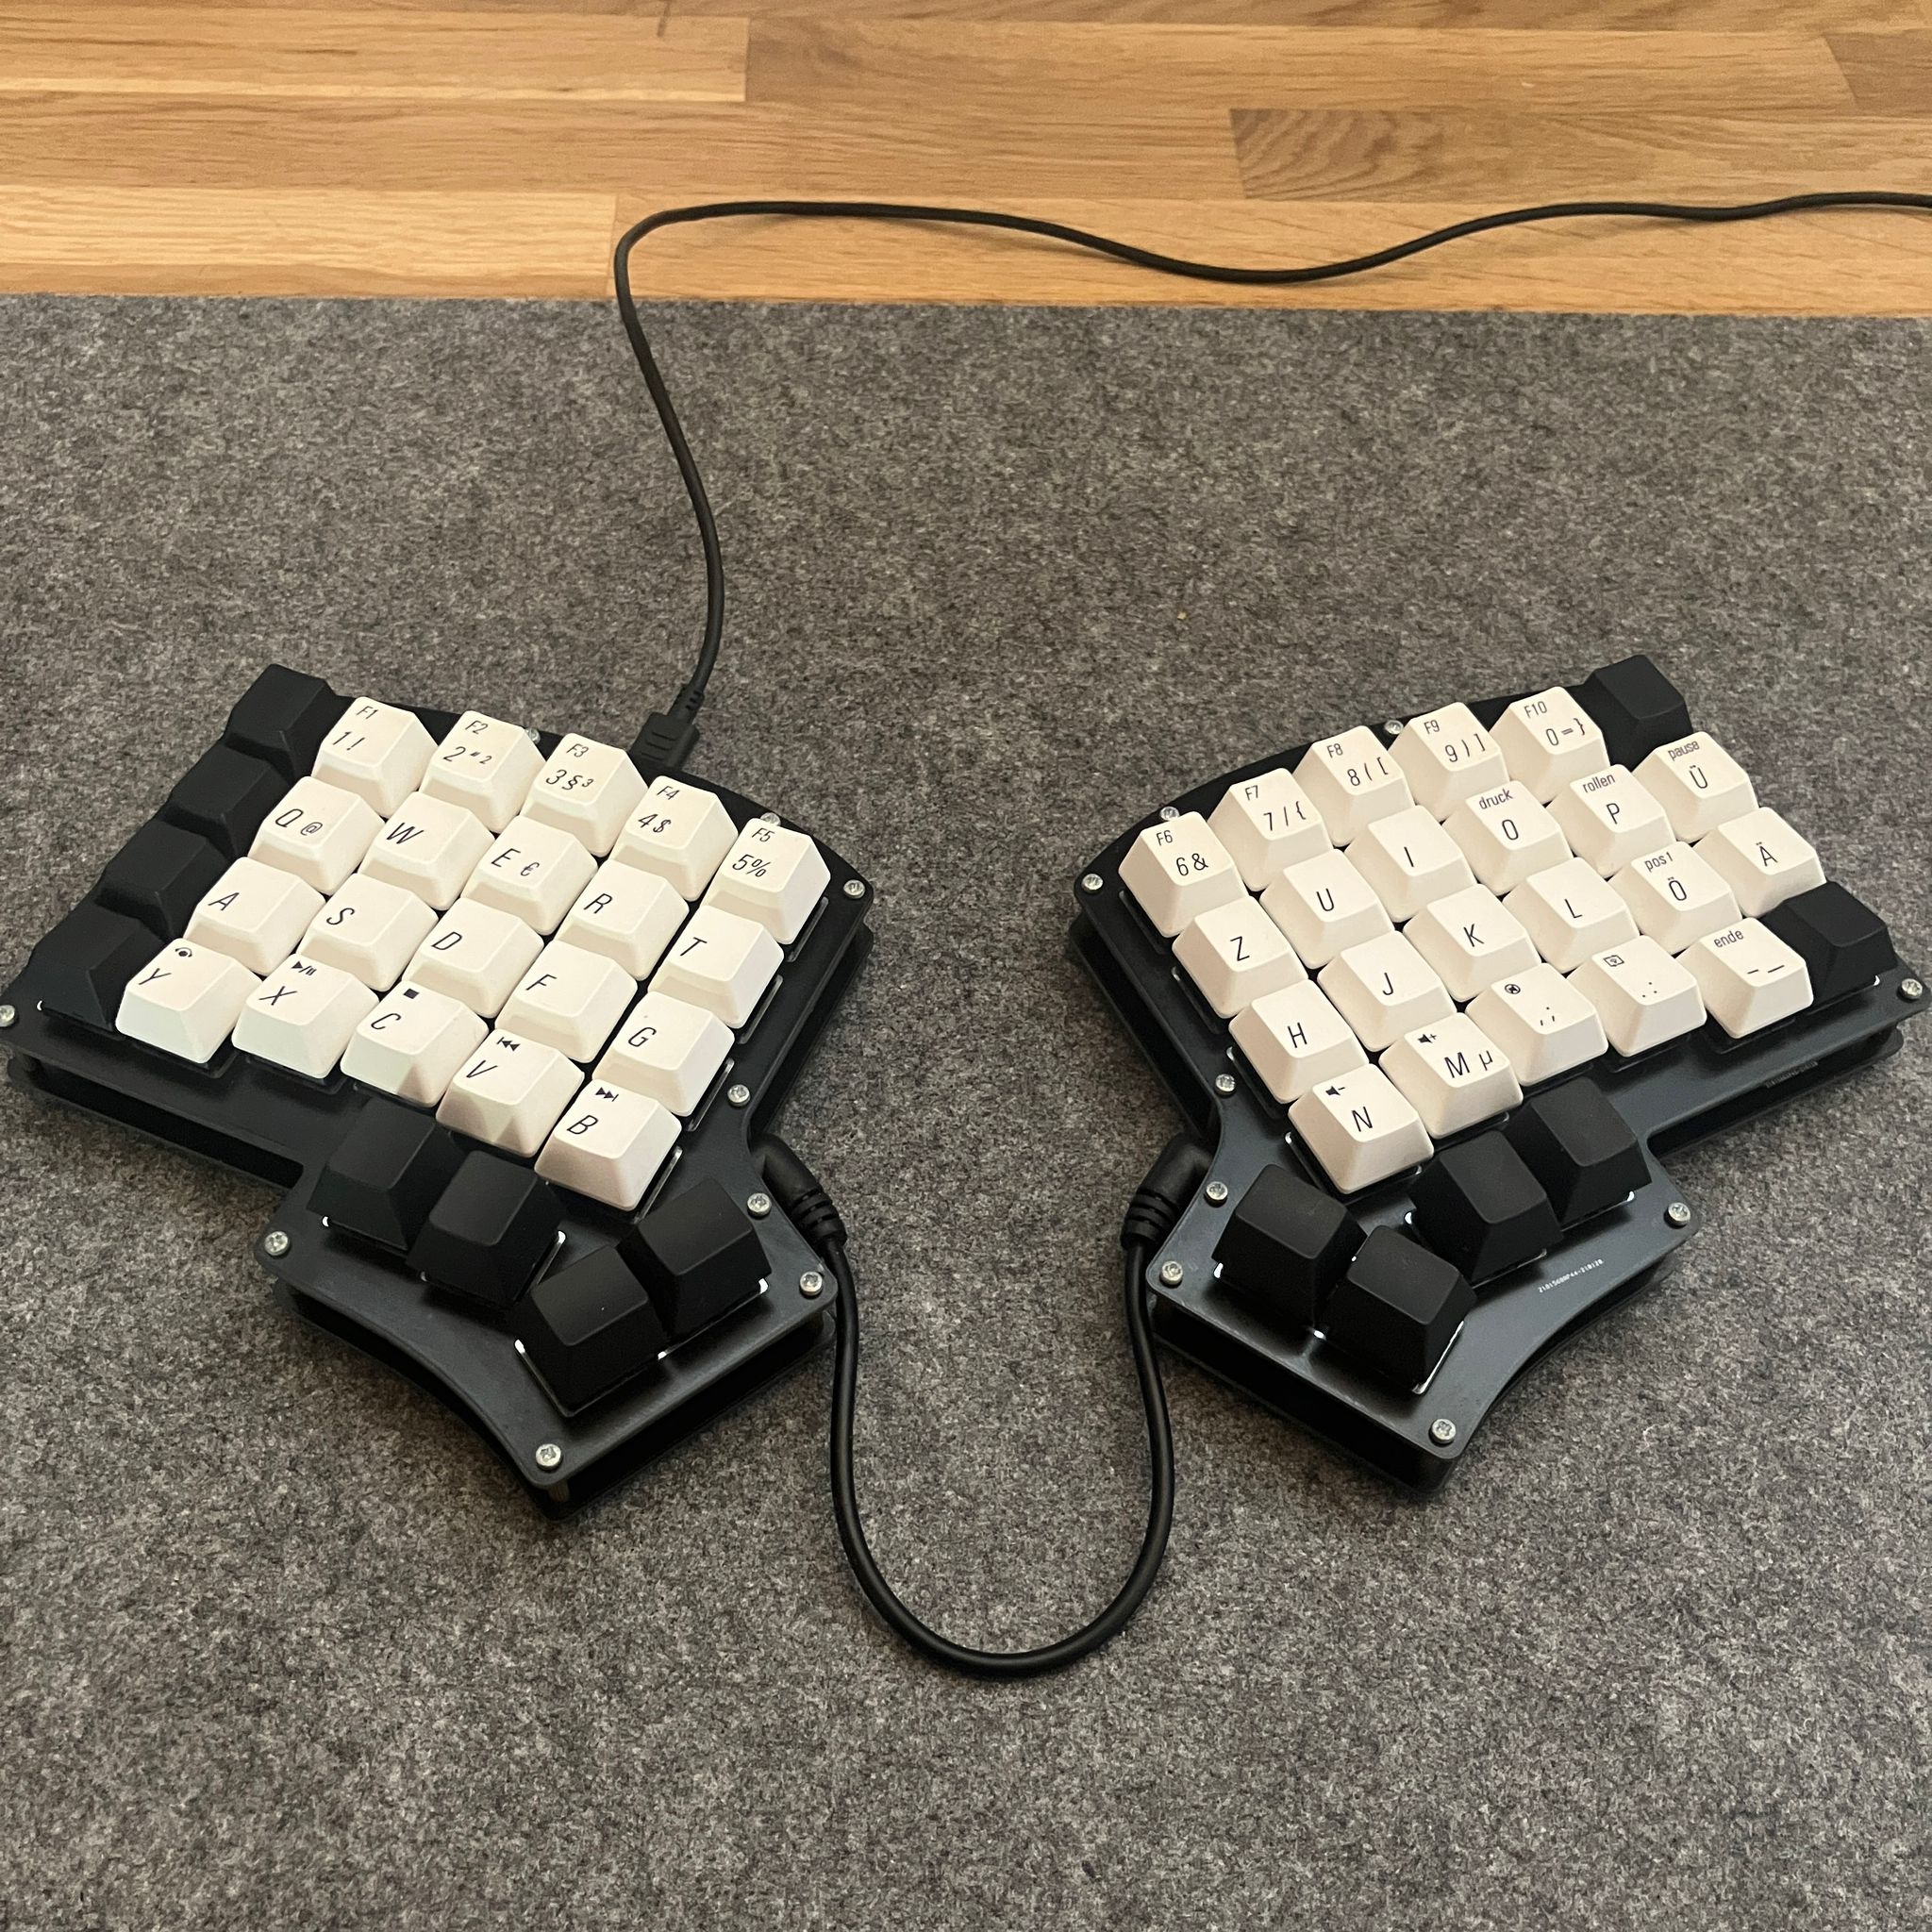
The assembled DYI Keebio Iris v2
Why?
You might rightfully ask yourself: “Why would someone need a split keyboard?”. Here are some reasons why (My Opinion/No scientific evidence):
- Split keyboards are more ergonomic and reduce pain in your hands/arms! This is beacause your arm posture is more natural and not crammed together compared to traditional keyboards.
- Faster to type: With some practice and only if you are able to touch-type!
- Fun to build (Open-Source Firmware, the ability to customize)
The main motivation for me was curiosity, watching the following video got me intrested. Though I have to say my opinion regarding the use of backspace differs from Lex Fridmans:
Backspace symbolizes a mistake […] so you have to take a physical painful action to fix that mistake. [brand split keyboard] makes it pleasant and easy to correct that mistake.
Mistakes have to be painful, pain makes you better! (obviously take this with a grain of salt) Looking up the price-tag of the mentioned brand split keyboard from the video immediately threw me off; it was around 500-700€ at the time. That’s a lot of money, too much for me. But I then was pleasantly surprised to see that there is an active community building custom DIY split keyboards which are way more affordable, not forcing you to sell one of your kidneys.
Bill of Materials
Here is a list of the different components used, including a rough estimation of the costs:
| Component | Description | Amount | Price p.P. |
|---|---|---|---|
| Pro Micro Atmega32U4 | Microcontroller (Master/Slave configuration) | 2x | ~6€ |
| Keebio Iris v2 (rev. 2.8) | DIY kit: PCBs, Z-Diodes, 3.5mm-cable and -jacks | 1x | ~80€ |
| Keycaps | Black Keycaps (a whole 100% keyboard pack) | 1x | ~40€ |
| Switches | Mechanical key switches (36 pcs. pack) | 2x | ~10€ |
Also please factor in that you do need a soldering iron and equipment to assemble the keyboard. I know this is all still a bit on the pricy side. By 3D printing the keyboard case and hand-wiring the whole thing together you could save an additional ~60€ used for the DIY kit. I recently even saw a pre-built DIY board on Amazon (~60€), be it a different model that already includes the micro-controllers, diodes and basically only requires switches and key-caps. All in all this could set you back roughly ~150€. If you can harvest switches from an old mechanical keyboard you are obviously saving on that part, which is what I did.
Assembly
Sadly I don’t have any pictures of the build process anymore. But there is this official Kheebio guide. If this is not helpful, search for videos on YouTube—there are plenty of tutorials.
Software and Configuration
The firmware used on the micro-controllers is QMK. I strongly
recommend following their detailed description on setting up your QMK Environment.
When finished they also offer a online configurator for key-mapping. I however
choose to edit qmk_firmware/keyboards/keebio/iris/default/config.json directly.
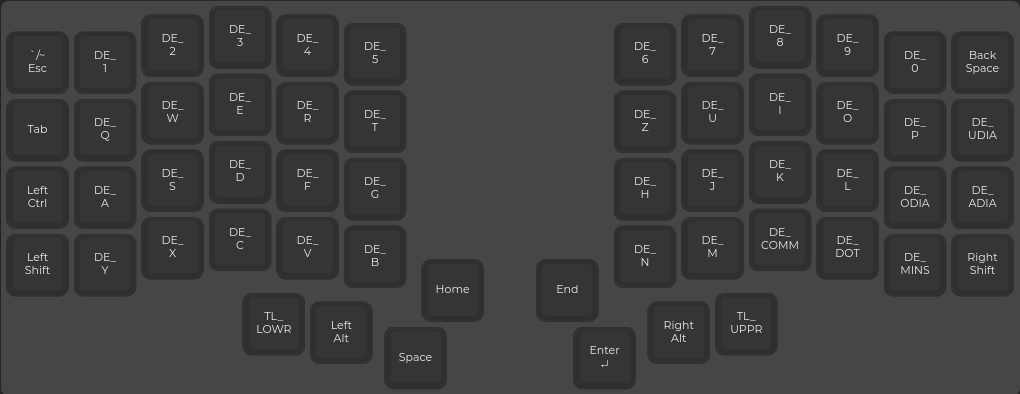
Level 0
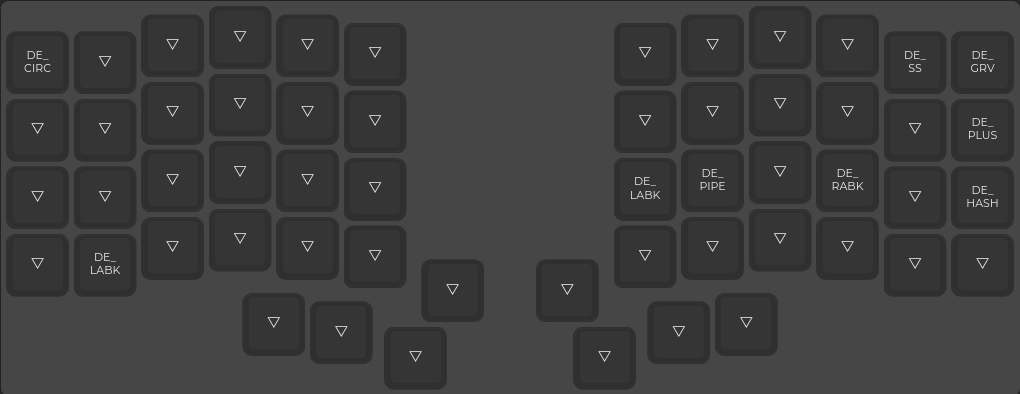
Level 1
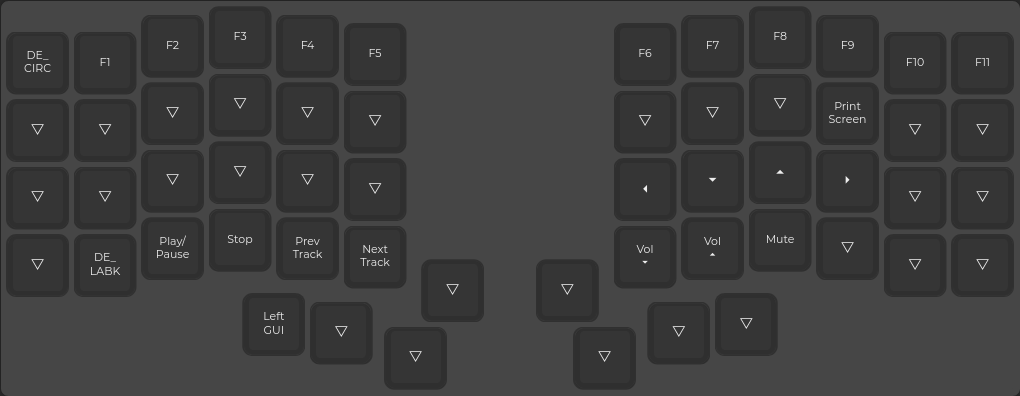
Level 2
For german keymaps use "host_language": "german". Inside your configuration you can start those with DE_.
Edit qmk_firmware/keyboards/keebio/iris/default/config.json:
{
    "config": { "features": {"tri_layer": true} },
    "keyboard": "keebio/iris/rev2",
    "keymap": "ckiri",
    "host_language": "german",
    "layout": "LAYOUT",
    "layers": [
        [
            "QK_GESC", "DE_1"   , "DE_2"   , "DE_3"   , "DE_4"   , "DE_5"   ,                      "DE_6"   , "DE_7"   , "DE_8"   , "DE_9"   , "DE_0"   , "KC_BSPC",
            "KC_TAB" , "DE_Q"   , "DE_W"   , "DE_E"   , "DE_R"   , "DE_T"   ,                      "DE_Z"   , "DE_U"   , "DE_I"   , "DE_O"   , "DE_P"   , "DE_UDIA" ,
            "KC_LCTL", "DE_A"   , "DE_S"   , "DE_D"   , "DE_F"   , "DE_G"   ,                      "DE_H"   , "DE_J"   , "DE_K"   , "DE_L"   , "DE_ODIA", "DE_ADIA",
            "KC_LSFT", "DE_Y"   , "DE_X"   , "DE_C"   , "DE_V"   , "DE_B"   , "KC_HOME", "KC_END", "DE_N"   , "DE_M"   , "DE_COMM", "DE_DOT" , "DE_MINS", "KC_RSFT",
                                                        "TL_LOWR", "KC_LALT", "KC_SPC" , "KC_ENT", "KC_RALT", "TL_UPPR"
        ],
        [
            "DE_CIRC", "_______", "_______", "_______", "_______", "_______",                       "_______", "_______", "_______", "_______", "DE_SS",   "DE_GRV",
            "_______", "_______", "_______", "_______", "_______", "_______",                       "_______", "_______", "_______", "_______", "_______", "DE_PLUS",
            "_______", "_______", "_______", "_______", "_______", "_______",                       "DE_LABK", "DE_PIPE", "_______", "DE_RABK", "_______", "DE_HASH",
            "_______", "DE_LABK", "_______", "_______", "_______", "_______", "_______", "_______", "_______", "_______", "_______", "_______", "_______", "_______",
                                                        "_______", "_______", "_______", "_______", "_______", "_______"
        ],
        [
            "DE_CIRC", "KC_F1",   "KC_F2",   "KC_F3",   "KC_F4",   "KC_F5",                         "KC_F6"  , "KC_F7"  , "KC_F8"  , "KC_F9"  , "KC_F10" , "KC_F11" ,
            "_______", "_______", "_______", "_______", "_______", "_______",                       "_______", "_______", "_______", "KC_PSCR", "_______", "_______",
            "_______", "_______", "_______", "_______", "_______", "_______",                       "KC_LEFT", "KC_DOWN", "KC_UP",   "KC_RGHT", "_______", "_______",
            "_______", "DE_LABK", "KC_MPLY", "KC_MSTP", "KC_MPRV", "KC_MNXT", "_______", "_______", "KC_VOLD", "KC_VOLU", "KC_MUTE", "_______", "_______", "_______" ,
                                                        "KC_LGUI", "_______", "_______", "_______", "_______", "_______"
        ]
    ]
}
I know, I am barley using the full potential here (if you look at the key-mappings), but this might change in the future. For now the layout should resemble a traditional QERTZ layout with some minor changes. I still have to work with regular keyboards an therefore don’t want to completely ruin my muscle memory.
Now it is just a matter of building the firmware:
qmk compile -kb keebio/iris/rev2 -km ckiri
And flashing it to the microcontroller (mind the instructions while flashing—it requires you to press the rest button):
qmk flash